The Global Object Security Policy (GOSP) is a setting in the Adobe Reader, Acrobat and PDF-XChange apps that controls how cookies behave. The default setting is "enable global object security policy" which means that every time someone renames a file or moves a file to a different location, a different cookie is created each time.
The Adobe and PDF-XChange device cookies (also known as 'Tracking ID' in the User Activity Log) relate to the "PDF (Adobe) Limit" in your DRM Policy Settings:
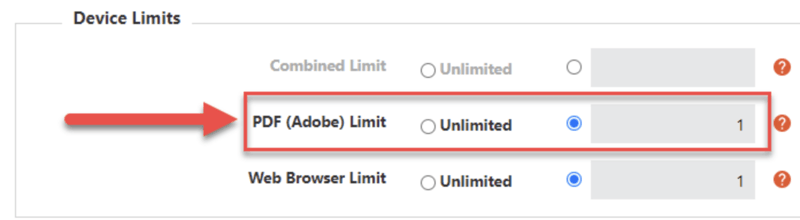
Since Vitrium's protected content relies on these cookies to track the number of 'devices' that a user opens the protected PDF on, it is STRONGLY recommended that end users disable this feature.
- If your end user DOES NOT disable this feature
Then, they will track multiple cookies (or tracking IDs) on their same computer and may reach their device limit unnecessarily, prompting a support call to your organization. - If your end user DOES disable this feature
Then, the Adobe or PDF-XChange app will track a single device cookie (or tracking ID) on that machine and the user will not likely reach their device limit.
Disable GOSP in Adobe (PC)
Disabling the "global object security policy" does NO HARM to your user’s computer. It is simply a mechanism to create a single tracking ID (or cookie) on their computer, no different than how a browser session tracks cookies as well.
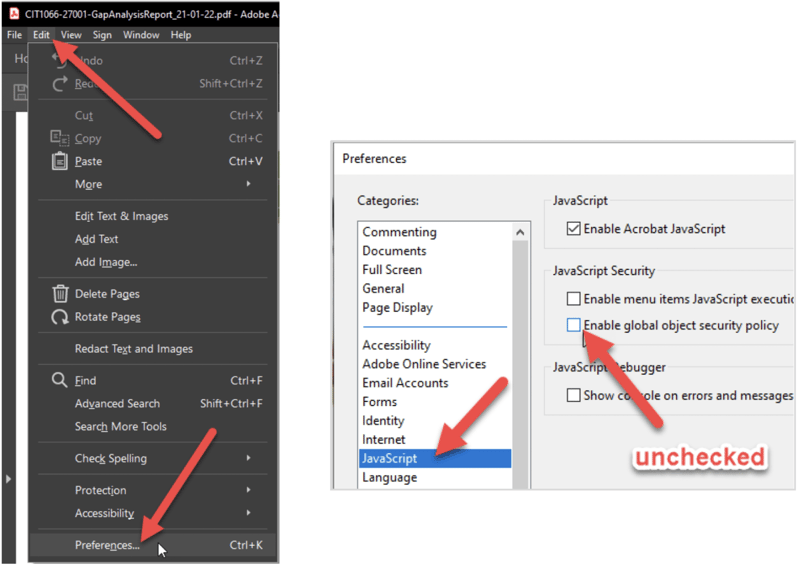
To disable this feature in Adobe on a PC:
- From the top menu bar, click Edit > Preferences.
- Under Categories, click JavaScript.
- Uncheck the field "Enable global object security policy" and ensure the "Enable Acrobat JavaScript" field is checked.
- Click OK.
Disable GOSP in Adobe (Mac)
Disabling the "global object security policy" does NO HARM to your user’s computer. It is simply a mechanism to create a single tracking ID (or cookie) on their computer, no different than how a browser session tracks cookies as well.
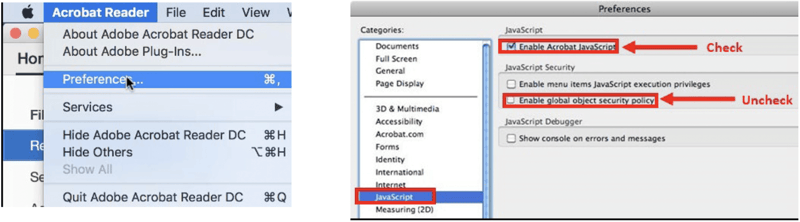
To disable this feature in Adobe on a Mac:
- From the top menu bar, click Acrobat Reader > Preferences.
- Under Categories, click JavaScript.
- Uncheck the field “Enable global object security policy" and ensure the "Enable Acrobat JavaScript" field is checked.
- Click OK.
Disable GOSP in PDF-XChange
Disabling the "global object security policy" does NO HARM to your user’s computer. It is simply a mechanism to create a single tracking ID (or cookie) on their computer, no different than how a browser session tracks cookies as well.
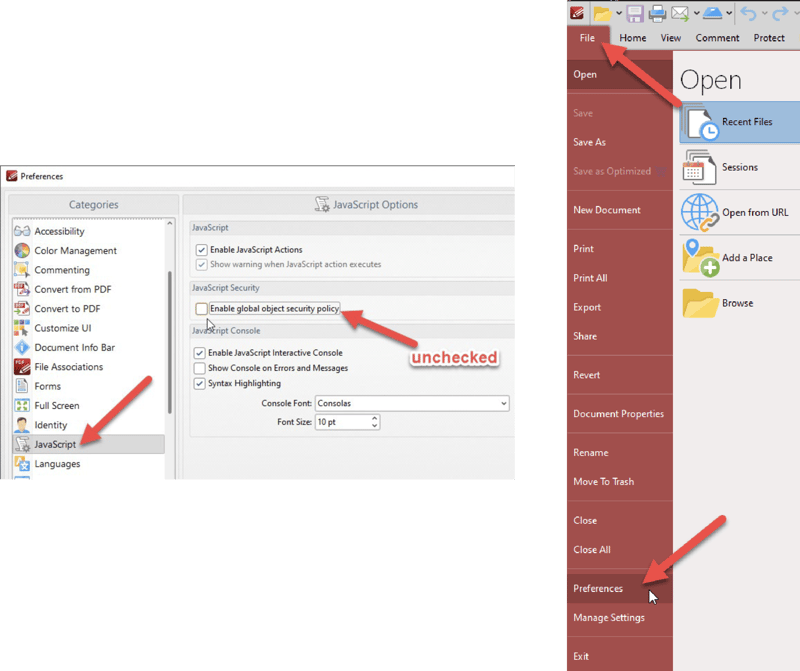
To disable this feature in PDF X-Change (on a PC only):
- From the top menu bar, click File > Preferences.
- Under Categories, click JavaScript.
- Uncheck the field: "Enable global object security policy".
- Click OK.
Disabling the "global object security policy" does NO HARM to your user’s computer. It is simply a mechanism to create a single tracking ID (or cookie) on their computer, no different than how a browser session tracks cookies as well.
To disable this feature in Adobe on a PC:
- From the top menu bar, click Edit > Preferences.
- Under Categories, click JavaScript.
- Uncheck the field "Enable global object security policy" and ensure the "Enable Acrobat JavaScript" field is checked.
- Click OK.
Bluebeam Revu
Bluebeam Revu does not have a "GOSP" setting. GOSP stands for Global Object Security Policy, which appears in Adobe Acrobat and PDF X-Change. However, if you encounter issues with Bluebeam Revu, you can follow the steps below o achieve the same effect by managing Bluebeam's JavaScript Web Services and Trust Center settings instead:
- Open Bluebeam Revu.
- Open the Preferences window by pressing Ctrl + K (or go to Revu > Preferences).
- Click on JavaScript tab near the top.
- Check that Enable Acrobat JavaScript is active.
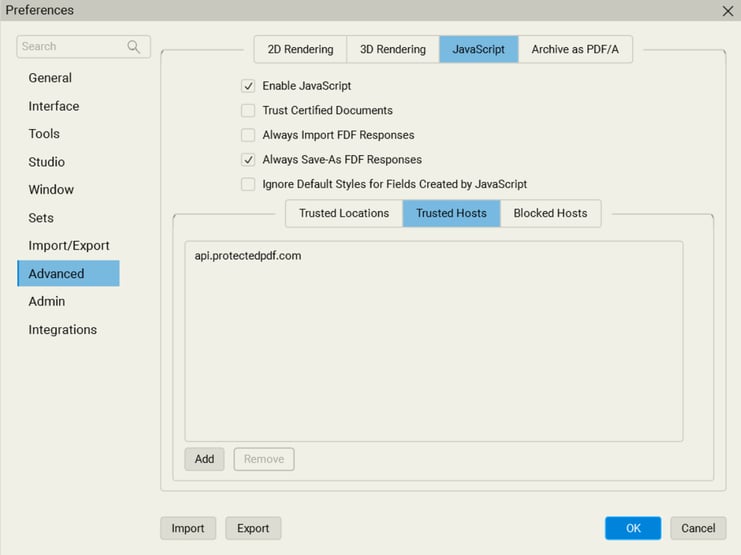
- End Users may need to add protectedpdf.com or your custom domain to the Trusted Hosts section as well.
- Click on the Trusted Hosts tab near the centre.
- Click ADD.
- Enter the relevant domain.
- Click OK.
- Ensure you click OK in the bottom right to save the changes. Relaunch the app and try to open the Protected PFD again.