There are 3 primary ways you can add content into Vitrium for protection:
| Manually | Bulk Upload | Via API |
|
|
|
Adding Folders
Before you start adding content, you should consider adding folders first. This is because Vitrium's manual method of adding content does not include the ability to add folders, though the bulk upload utility can. Contact Vitrium for info about the bulk upload utility.
- To add a folder, in the Vitrium CONTENT tab, click the Add Folder icon in the left-hand corner of the Folders section

- Enter the following information:
- Folder Name (required)*
- External Key (in Advanced Options) - if you wish to add a product ID or specific document ID from your other system that will be connected to Vitrium
- If you want to customize your folders for the User Portal, then you can also add this optional information or click here to learn more: Customizing Folders
- Folder Name to Display
- Folder Description
- Folder Image
- Folder Color
- Click Save & Exit.
*If you wish to have your folders ordered in a specific way, we recommend adding numbers in front of the Folder Name field, but then the actual name you want to display in the User Portal with the Folder Name to Display field.
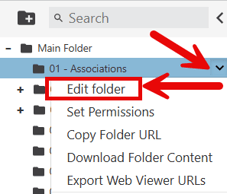
Edit Folders
To edit a folder, click the small arrow beside the folder name, then select Edit folder, then edit the information you want, and click Save & Exit.
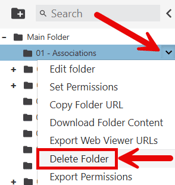
Delete Folders
To delete a folder, click the small arrow beside the folder name, then select Delete Folder.
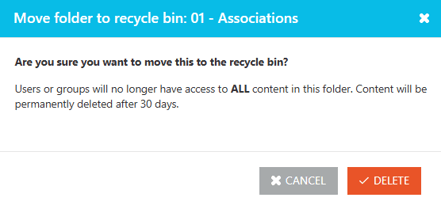
A pop-up window will appear confirming that you wish to delete the folder along with all the content that is contained within that folder, all of which goes to the recycle bin for 30 days before they are permanent deleted.
Adding Content (manually)
You can add a single file at a time or add multiple files of the same type: all documents at one time, or all videos at one time, but not a mix of both.important note
You should make sure that you are happy with your Watermarks and Content Settings before uploading a lot of content. This is because there is a limit restriction if you need to change a watermark or content setting after.
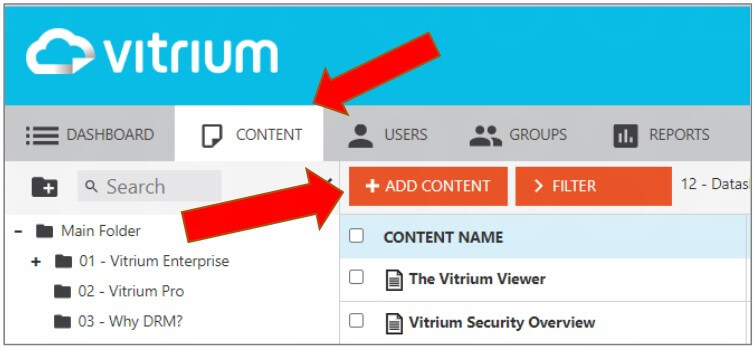
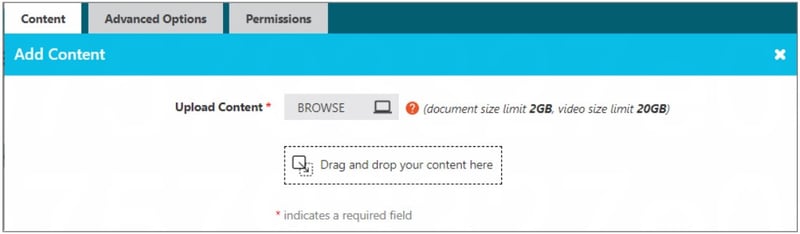
- In your Vitrium account, go to the CONTENT tab and click ADD CONTENT:
- Click BROWSE to find your content to upload or drag & drop your content into this window. Remember, you can add multiple files (of the same type) at the same time.
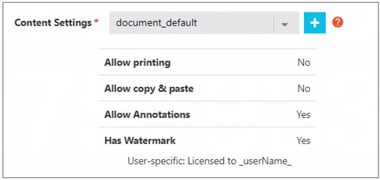
- Select your Content Settings for this content. Refer to the Content Settings section to learn how to add or modify these.
- Enter any Tags that you may wish to apply. These are meta keywords that can be helpful for Vitrium admins when searching for content in the Admin UI or for end users searching for content in the User Portal.

- Click Save & Exit now, or continue to the Advanced Options tab. A description of all the fields under the Advanced Options window is provided further below.
- Once you click Save & Exit, your content will go through two stages:
- UPLOADING STAGE
Your content is being uploaded to Vitrium’s server.
- PROCEESING STAGE
Your content is being encrypted and converted to Vitrium’s secure format(s).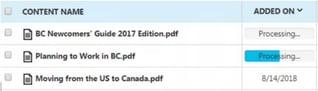
- UPLOADING STAGE
- Once your content is completed processing, you will see the WEB LINK and SECURE PDF display in the Content tab.
important note
Processing for videos or larger file uploads may take some time. Please be patient and DO NOT attempt to delete anything or re-upload the file multiple times as this will further compound the delays.
Advanced Options Tab
The fields in the Advanced Options tab will differ slightly depending on what type of content you’re uploading:
| Field | For Docs & Images | For Audio & Video |
| Content Title Enter a different file name if you wish to change it from the original. |
||
| Pages to Leave Unprotected Applicable to protected PDF only (not web viewer). It allows you to leave specific pages in your document unprotected. |
||
| Thumbnail This is the thumbnail image that shows in the User Portal. Recommended dimensions: 212 x 165 ratio. |
||
| External Key This allows you to store a product ID or file ID from your CRM, eCommerce, or other system to connect it to Vitrium. |
||
| Notify User When New Version Available End users will be notified whenever there is a new version of the content replacing the original content. Applicable to web viewer only, not protected PDF. |
||
| Disable Web Viewer This allows you to disable access to the web viewer and only produce the protected PDF. |
Permissions Tab
Refer to the next section Assigning Permissions for how to assign permissions to content as you may want to assign it at the folder level.
Bookmarks Tab
This tab only appears for video and audio content. You can add different bookmarks at various times in your video or audio content, which may be helpful for your users to skip ahead to a specific chapter or point in time of your content.
Customizing Folders for Portal
If you wish to make your User Portal stand out with more style, then you can individually customize each folder. Review this information below to learn how and see a few different examples below:
| Field Label | Description |
| Folder Name | This is the folder name that will appear to staff users in the Vitrium admin Content tab. |
| Folder Heading | This is the folder name that will appear to end users in the customized User Portal. It is recommended to use less than 20 characters. |
| Folder Description | This is the text description that will appear at the top of the portal screen when an end user clicks into that folder. It is recommended to use HTML code so you can change the font type and size. |
| Use Image | Select this if you want to use a custom image for the folder. |
| Portal Image | Upload the custom image you want to use for the folder. |
| Use Folder Specific Colors | Select this if you want to select a custom color for the folder. |
| Folder Color | Use the color selector to choose your folder color. |
| Folder Text Color | Use the color selector to choose your folder text color. |
Sample Portals with Customized Folder Colors & Images

