Content Settings are the first layer of protection that you will apply to your content at the upload stage. You must set up your Watermark Settings first, then apply this to your Content Settings. These 2 types of settings get combined with your content.
important note
It is very important to test your watermarks and content settings with 1 or 2 documents or videos BEFORE you begin a mass upload! This is because you cannot change any watermark or content settings that are linked to more than 250 documents, 30 videos, or 20 audio files. You will need to contact Vitrium Support to assist you in making those changes.
- Add Content Settings for Documents & Images
- Add Content Settings for Videos
- Add Content Settings for Audio
Add Content Settings for Documents & Images
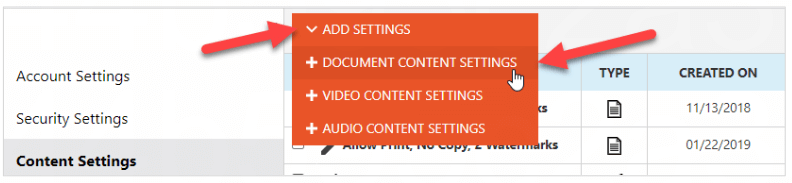
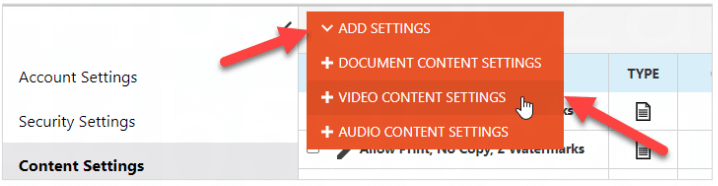
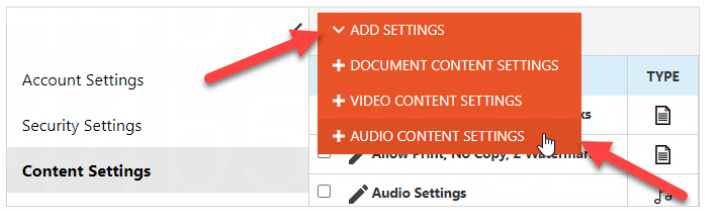
- In Vitrium, go to the SETTINGS tab.
- Select Content Settings.
- Click ADD SETTINGS.
- Then select DOCUMENT CONTENT SETTINGS from the drop-down menu.
Give your content setting a specific name, then choose your options and click Save & Exit. Refer below for a definition of each field
important note
If your document content setting is linked to more than 250 files, you will need to contact Vitrium Support to assist with making certain changes (such as watermark, printing limitations, etc).
Content Settings
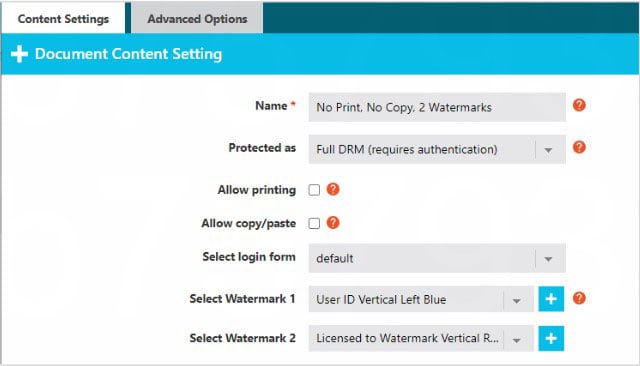
- Name
This is the name of your content setting. It is recommended to give it a specific name identifying the details included in the setting. For example:
- No Print, No Copy, 2 Watermarks (left & right).
- Allow Print, Allow Copy, 1 Watermark (bottom center).
- Protected As
There are two options to choose from:
- Full DRM (default): this will provide you the fullest extent of DRM for your content including the requirement for user authentication + the ability to set various DRM controls.
- Social DRM: this option does not require a login or authentication to access content, but it will still allow you to block printing and copying, apply watermarks, and set start and end dates.
- Allow Printing
Leave blank if you DO NOT wish to allow printing. Check it if you do wish to allow printing. - Allow Copy/Paste
Leave blank if you DO NOT wish to allow copy & paste. Check it if you do wish to allow copy & paste. - Select Login Form
Choose a login form for your protected PDF file. This is separate from the web viewer login page. You may only have the default form available. Contact the Vitrium team if you want a custom form. - Select Watermark
Choose a watermark setting. You may only have a default option available, but you can add more watermark settings to your account by going to Watermark Settings in the Settings tab. You can add more than one watermark to the content setting by clicking the Add Watermark link and
then selecting another one.
Advanced Options
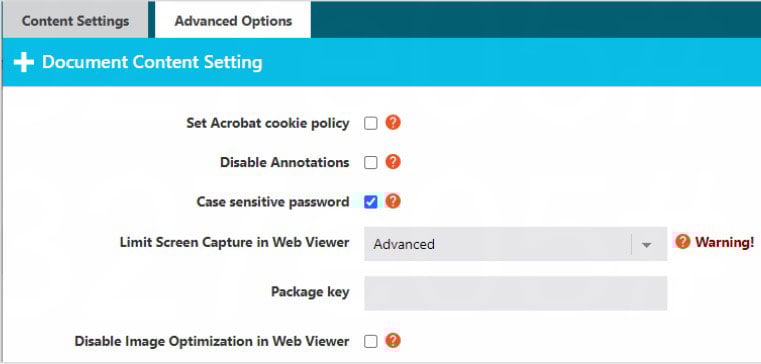
- Set Acrobat cookie policy
Check this if you want to change the behavior of the global object security policy (GOSP) pop-up message that appears in the protected PDF file. The GOSP relates to how Vitrium tracks ‘device limit’.- PromptAndCloseDocument: the default setting, the GOSP pop-up will appear, and the user will need to close it, make the required change (disable the GOSP), then re-open the file to unlock it.
- PromptOnly: the GOSP pop-up will appear with instructions for disabling it, but the user can close it and continue to unlock their document; no cookie gets stored so the user may reach their device limit.
- NoPromptAndNoClose: the GOSP message will NOT appear at all and is only recommended in scenarios where you DO NOT require setting a device limit for users.
- Disable Annotations
Check this if you want to disable the annotations in the secure web viewer and protected PDF file. - Case Sensitive Password
This means any password used to access this content needs to be case-sensitive, keeping the mix of capital letters and lower-case letters such as HelloTest123! vs. hellotest123!
It is strongly recommended to leave the default checked since this is best practice in systems today. - Limit Screen Capture in Web Viewer
Vitrium employs several different techniques to limit (but not fully prevent) screen capture:- Basic: For some devices, this will block certain keyboard shortcut keys for screen capture. Windows machines will log a PS1 error in the Reports tab in Vitrium.
- Moderate (default): This will blur the screen when a user’s cursor clicks away from the web viewer.
- Advanced: Content will open blurred and will blur when the cursor is moved off the content in the web viewer. The user will have to click back on to the web viewer to unblur.
- None: This will not add any limiting features for screen capture prevention.
- Package Key
This option can be ignored as it is legacy field for older Vitrium customers. - Disable Image Optimization in Web Viewer
Check this option if some of your images have not converted well to the web viewer (i.e. they appear distorted or grainy). Selecting this option helps resolve some issues, but if it doesn’t, contact the Vitrium team for further assistance.
Add Content Settings for Videos
- In Vitrium, go to the SETTINGS tab.
- Select Content Settings.
- Click ADD SETTINGS.
- Then select VIDEO CONTENT SETTINGS from the drop-down menu.
Give your content setting a specific name, then choose your options and click Save & Exit:
Content Settings Tab
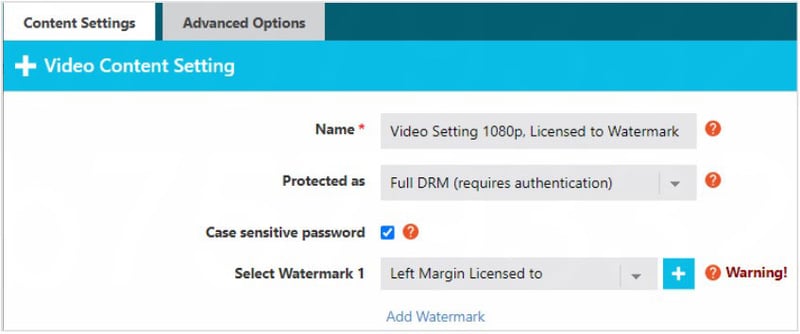
- Name
This is the name of your content setting. It is recommended to give it a specific name, such as:
- Video Setting 1080p, 1 Watermark (bottom center).
- Video Setting 480p+1080p, 2 Watermarks (left & right).
- Protected As
There are two options to choose from:
- Full DRM (default): this will provide you the fullest extent of DRM for your content including the requirement for user authentication + the ability to set various DRM controls.
- Social DRM: this option does not require a login or authentication to access content, but it will still allow you to block printing and copying, apply watermarks, and set start and end dates.
- Case Sensitive Password
This means any password used to access this content needs to be case-sensitive, keeping the mix of capital letters and lower-case letters such as HelloTest123! vs. hellotest123!
It is strongly recommended to leave the default checked since this is best practice in systems today. - Select Watermark
Choose a watermark setting. You can add more than one watermark by clicking the Add Watermark link and then selecting another one.
Advanced Options Tab

- Resolution
These are the different adaptive bitrate streams that your video will be converted to in the web player. The defaults are 480p (lower resolution) and 1080p (high resolution). When the user plays the video, the resolution will ‘adapt’ to their Internet speed, but they can also manually change this in the player. - Lossless Conversion
Select this if your video has very slow motion or not a lot of movement in it, as this will compress and the convert the video to the web player without any loss of information.
important note
Video content settings can be linked to 30 files before requiring assistance from Vitrium Support to make changes
Add Content Settings for Audio
- In Vitrium, go to the SETTINGS tab.
- Select Content Settings.
- Click ADD SETTINGS.
- Then select AUDIO CONTENT SETTINGS from the drop-down menu.
Give your content setting a specific name, then choose your options and click Save & Exit:

important note
Audio content settings can be linked to 25 files before requiring assistance from Vitrium Support to make changes.
Content Settings Tab
- Name
This is the name of your content setting. It is recommended to give it a specific name such as "Audi Setting" - Protected As
There are two options to choose from:
- Full DRM (default): this will provide you the fullest extent of DRM for your content including the requirement for user authentication + the ability to set various DRM controls.
- Social DRM: this option does not require a login or authentication to access content, but it will still allow you to block printing and copying, apply watermarks, and set start and end dates.
- Case Sensitive Password
This means any password used to access this content needs to be case-sensitive, keeping the mix of capital letters and lower-case letters such as HelloTest123! vs. hellotest123!
It is strongly recommended to leave the default checked since this is best practice in systems today.